






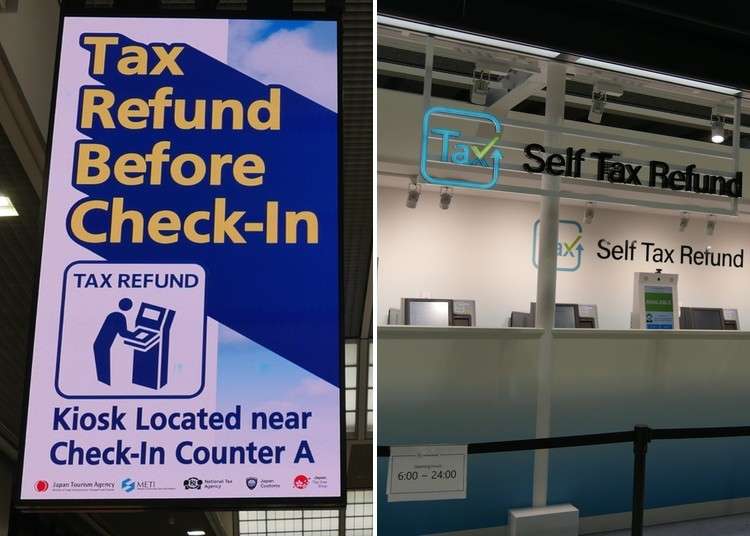
Narita Airport Terminal 2 Tax Refund: Route to Cash Refund
- Written by: LIVE JAPAN Coupon & Deals Team
Unsure where to go for a tax refund at Narita? Photos and arrows guide you to your cash (yen) refund on Terminal 2’s 3F.
Important
Complete customs confirmation (declaration) before you go to a refund facility
- You cannot receive your cash (Japanese yen) refund at a refund facility until you have completed confirmation (declaration) at a customs kiosk or on Visit Japan Web.
- Many travelers go straight to a refund facility without being confirmed. Complete your confirmation first, then go to the refund facility.
- If you will receive your refund by credit card or another cashless method, customs confirmation is still required.
3 Things to Know First
The 3rd floor of Narita Airport Terminal 2 is the “departures floor,” lined with check-in counters. You take care of your tax refund on this floor, before you board your flight. If it is your first time, it is natural to wonder where to go. This article guides you one step at a time, with photos and arrows.
- Where the customs kiosk is: On the 3rd floor of Terminal 2 (the departures floor), near check-in counter A. It is in the area before departure procedures, and you get confirmed before you check your baggage.
- Where you go depends on how you receive your refund: If you receive cash (Japanese yen), go to the refund facility after the customs kiosk. If you receive your refund by credit card or another cashless method, you do not go to the refund facility.
- The refund facility is in a different place: The refund facility where you receive cash is next to check-in counter G. It is in a different place from the customs kiosk.
For Narita Airport’s overall tax-free procedures (locations and steps for Terminals 1 to 3), see Narita Airport Tax Refund: Before You Check Your Bags. If you are flying from Terminal 1 or 3, see the Terminal 1 route or the Terminal 3 route.
3F Overall Map (Red Frames Show Where to Go)
First, check the overall layout. The red frames show where the customs kiosk and the refund facility are. The customs kiosk is at the lower left of the map, near check-in counter A. The refund facility is toward the top of the map, next to check-in counter G.
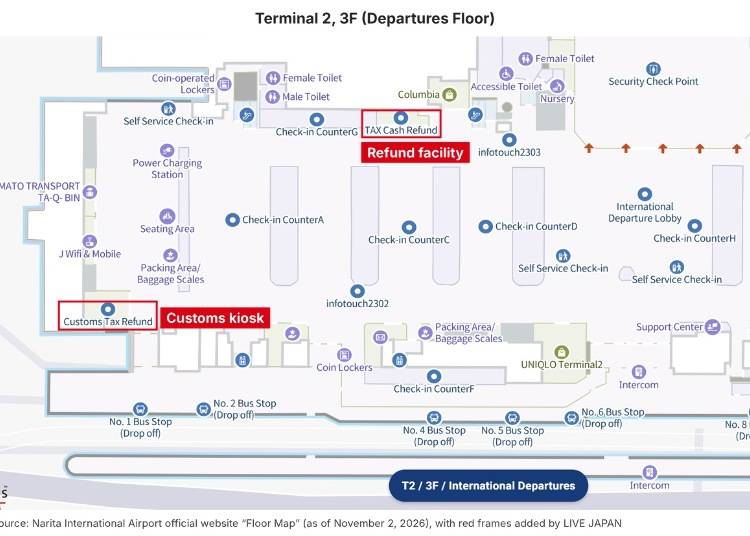
Floor map of Terminal 2, 3F (the red frames show the customs kiosk and the refund facility)
For a larger map and the latest information, see the floor map on the official Narita Airport website (Terminal 2, 3F).
Where You Go Depends on How You Receive Your Refund
- If you receive your refund by credit card or another cashless method: Customs confirmation (at the customs kiosk or on Visit Japan Web) is all you need to do at the airport. You do not need to go to the refund facility. You get confirmed before you check your baggage.
- If you receive cash (Japanese yen): After customs confirmation, you receive your cash at the refund facility. The route in this article is for you. You can complete customs confirmation either at the customs kiosk or on Visit Japan Web.
We Recommend Confirming on Visit Japan Web
We recommend completing customs confirmation on Visit Japan Web on your smartphone. You can confirm on your own screen without going to the customs kiosk. Visit Japan Web is also handy when you enter Japan.
- You can use it when you enter Japan: Before you arrive in Japan, you can complete immigration and customs declaration procedures on your smartphone.
- When you leave, you can also complete customs confirmation without going to the customs kiosk.
- In the area before departure procedures on the 3rd floor, you can connect to the dedicated Wi-Fi.
- Even if the customs kiosk is crowded, you do not have to wait in line.
- You can check the result of your customs confirmation afterward.
- Network name (SSID): Customs_WiFi_For_TaxRefund
- Password: jcustoms
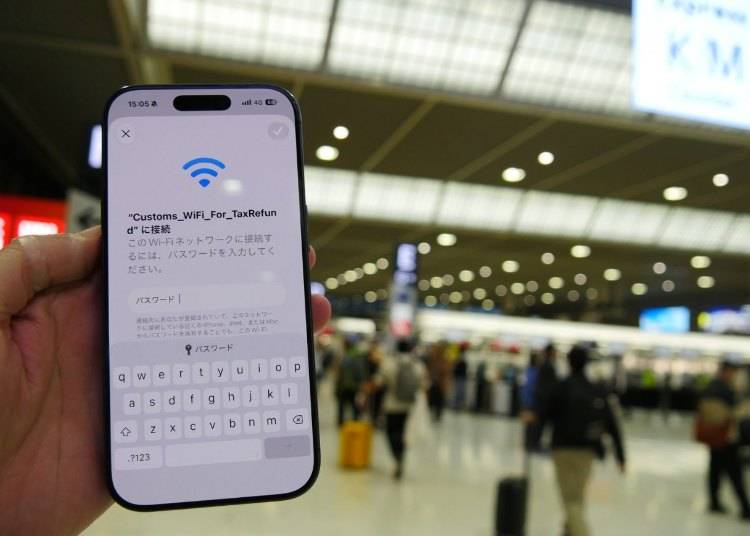
Wi-Fi connection screen (choose “Customs_WiFi_For_TaxRefund” and enter “jcustoms” as the password)
To use Visit Japan Web, you need to create an account and register your passport information and other details in advance. You can register on Visit Japan Web (official site). For how to use it, see also our guide to Japan’s tax-free system.
If you receive cash, go to the refund facility after customs confirmation is complete.
From Near Check-in Counter H to the Customs Kiosk
We guide you in 6 photos, from near check-in counter H on the 3rd floor to the entrance of the customs kiosk.
1 Start near check-in counter H on the 3rd floor. A large “H” is written on the pillar. From here, head toward check-in counter A.
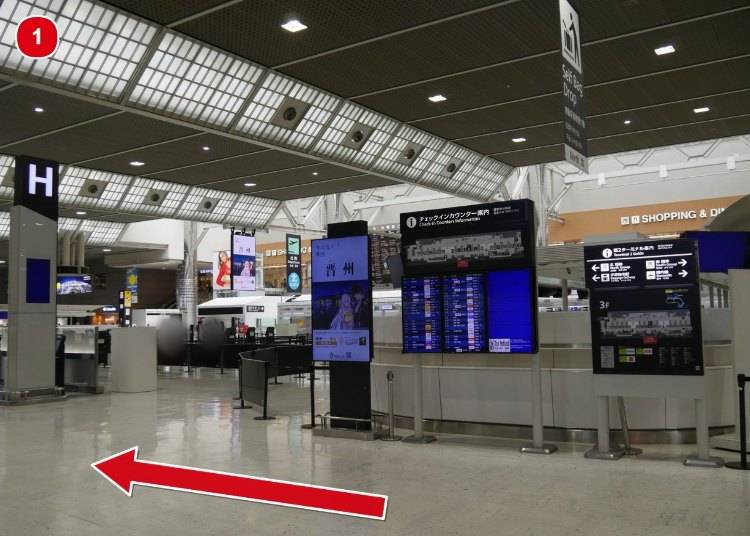
1: Near check-in counter H (3F)
2 The customs kiosk is near check-in counter A. Go straight along the corridor.
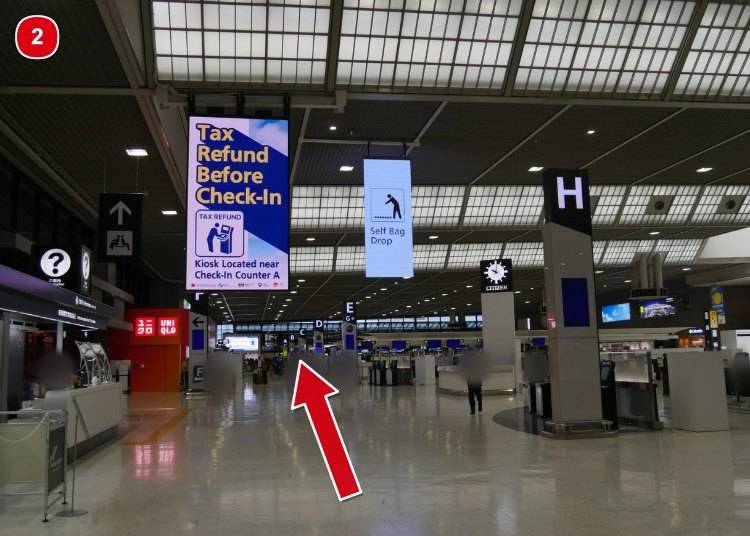
2: Head toward check-in counter A
3 Keep going along the wide corridor. On your right, there is a pillar marked “E.”
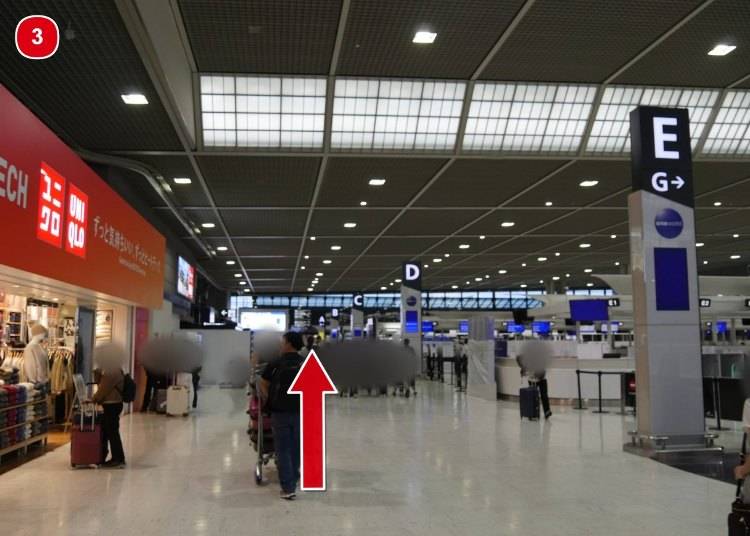
3: Pass the pillar marked “E”
4 Pass the pillars marked “D” and “C,” and keep going. Further ahead, you will see the pillars marked “B” and “A.”
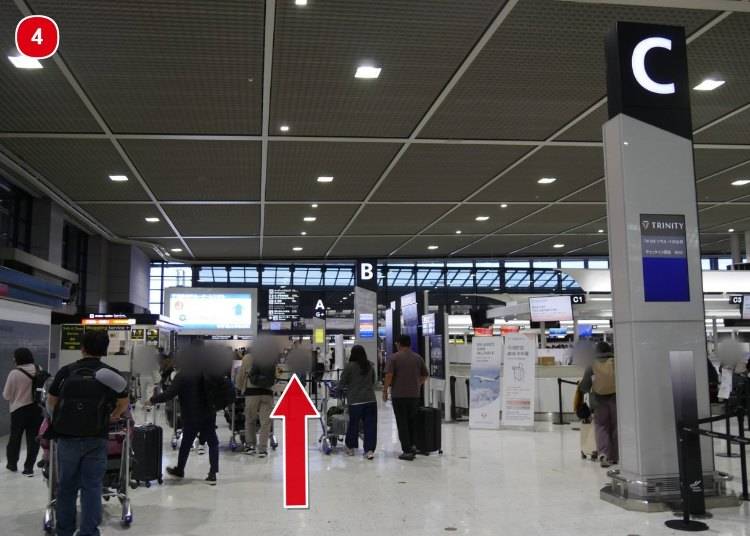
4: The pillars marked “C,” “B,” and “A” come into view
5 Pass beside the pillar marked “A.”
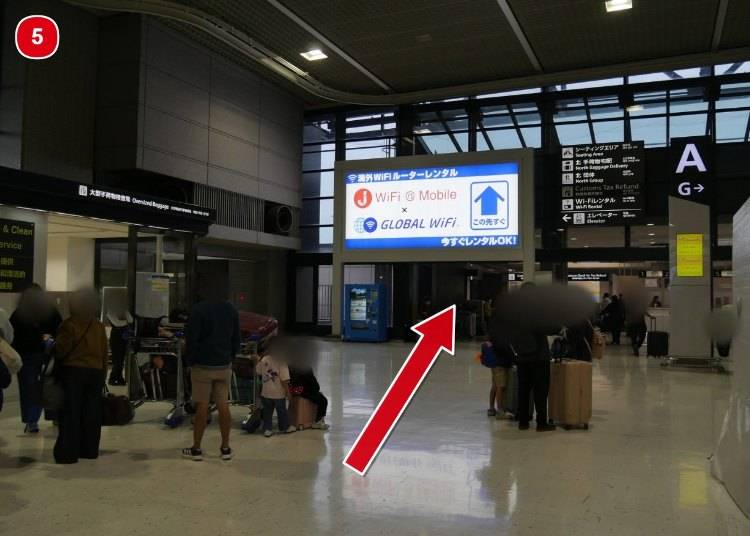
5: Pass beside the pillar marked “A”
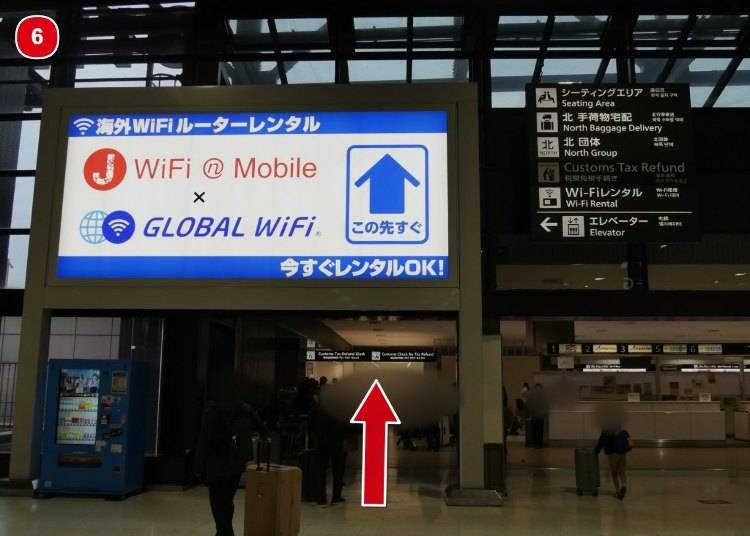
6 Just beyond that, you will see the entrance. The sign above the entrance reads “Customs Tax Refund Kiosk” and “Customs Check for Tax Refund.”
6: The customs kiosk entrance
From the Customs Kiosk to the Refund Facility (Cash Refunds)
The customs kiosk and the refund facility are in different places.
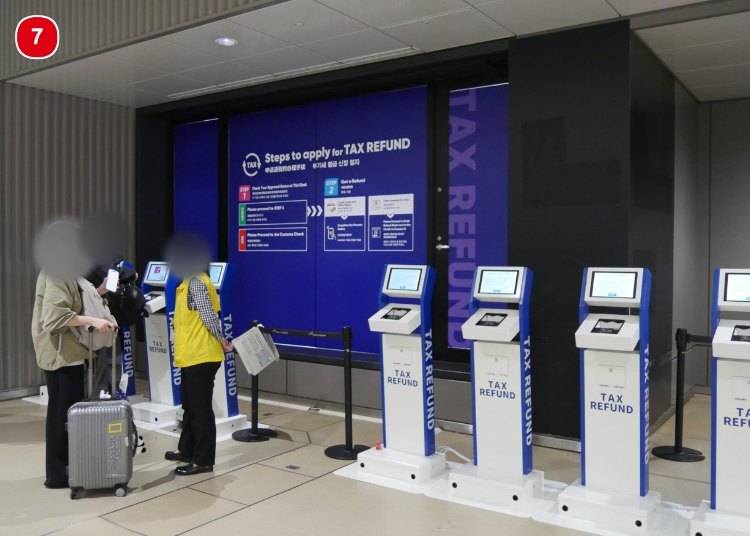
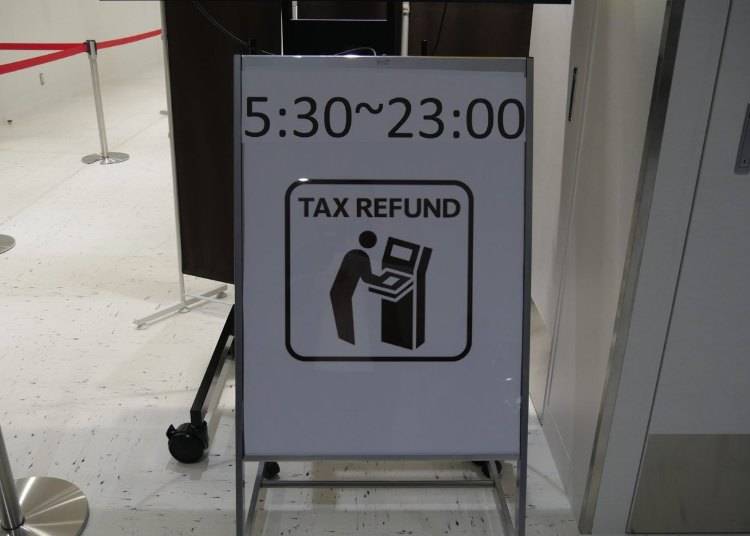
7 Inside the entrance, there is a blue guide board and the kiosk terminals. This is the customs kiosk. The customs kiosk is open 5:30–23:00 (as of November 2, 2026).
7: The kiosk terminals and the procedure guide
The customs kiosk hours sign (5:30–23:00)
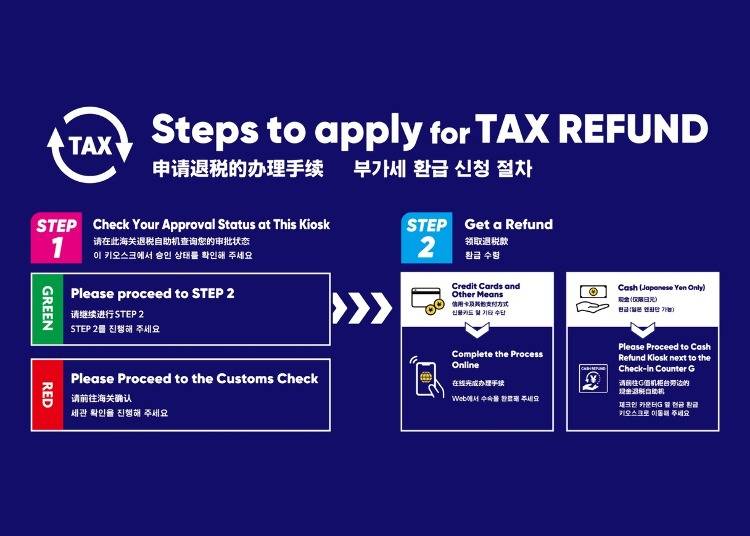
The sign shows STEP 1 (check your approval status) and STEP 2 (get a refund). If your result is GREEN, go on to STEP 2. If it is RED, go to the customs check. At STEP 2, if you receive your refund by credit card or another cashless method, the process is completed online. If you receive cash (Japanese yen only), go to the “Cash Refund Kiosk” (the refund facility) next to “Check-in Counter G.” This is a closer photo of the sign.
A close-up photo of the sign (Steps to apply for TAX REFUND)
8 Near the customs kiosk, there is a “TAX CASH REFUND” sign. The blue line on the map shows the route to the refund facility.
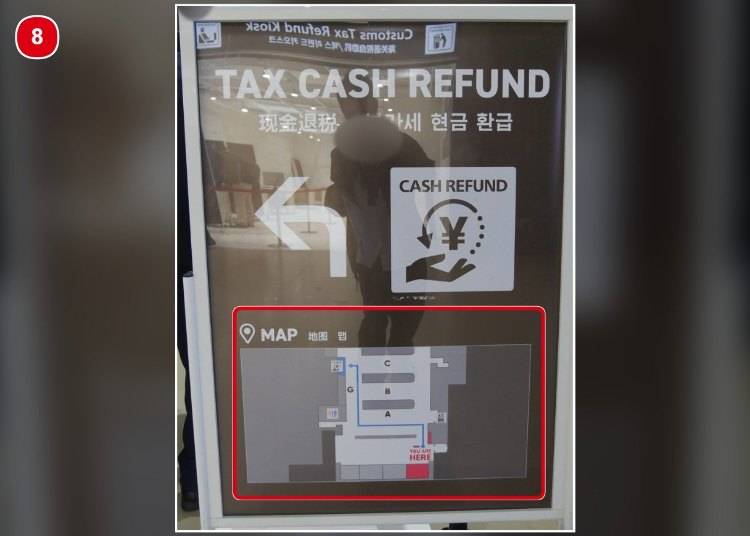
8: The sign near the customs kiosk (TAX CASH REFUND)
9 On the pillar marked “A,” there is a guide to “G.” Head to the left.
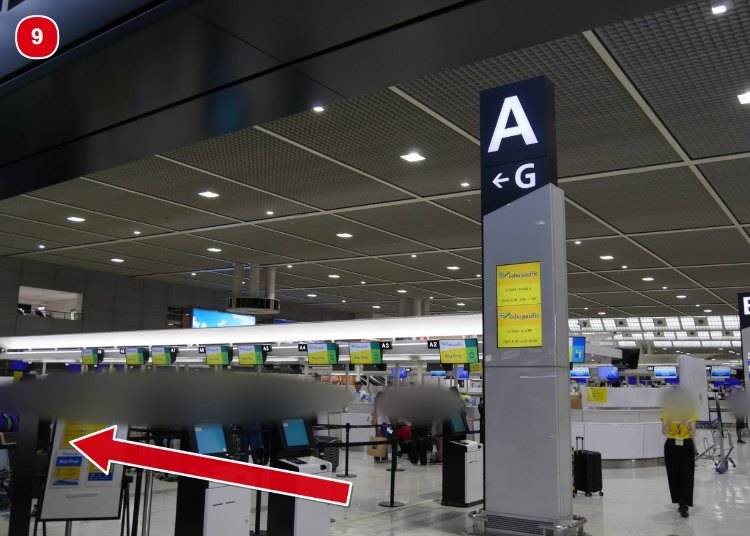
9: The guide to “G” on the pillar marked “A”
10 Go straight along the corridor with the “North Group” sign hanging overhead. On your right, you will see the “G” sign.
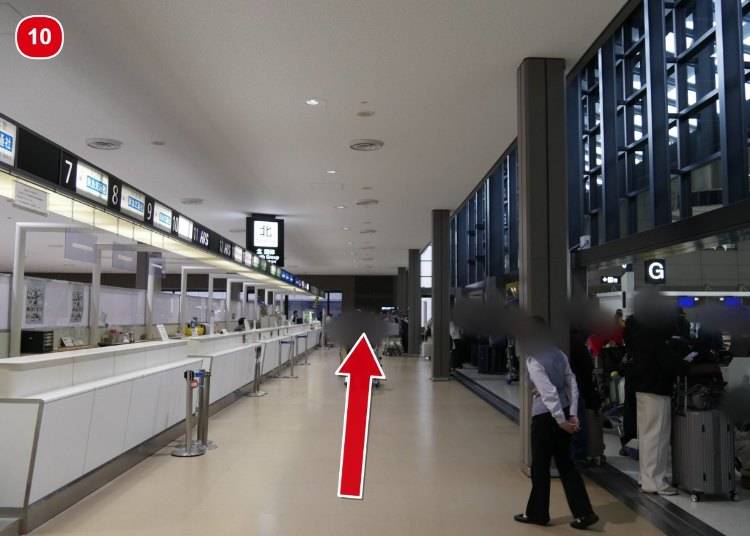
10: The corridor with the “North Group” sign
11 On the “TAX CASH REFUND” sign, there is an arrow pointing right. Head to the right.
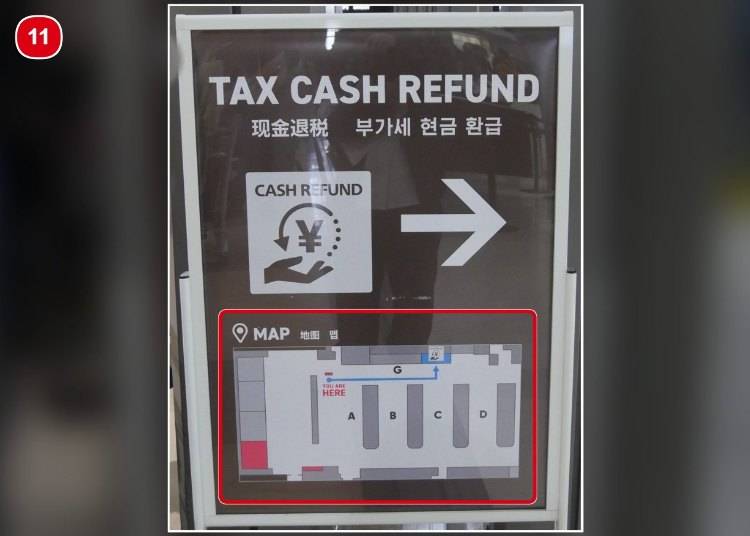
11: The “TAX CASH REFUND” sign (turn right)
12 Beyond the sign is a wide corridor. At the back right, you will see stairs and an escalator going up to the 4th floor (4F), but do not go up. Keep going along the 3rd floor.
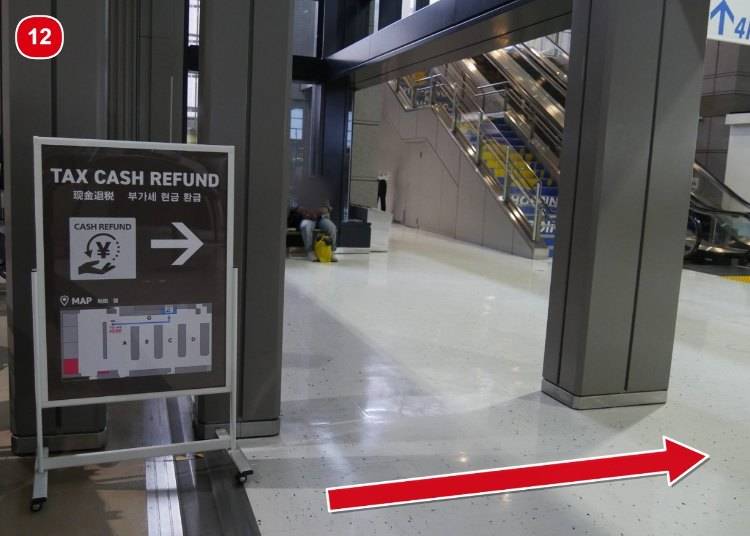
12: Pass in front of the stairs and escalator
13 You come out in front of check-in counter G. A large “G” is written on the pillar. Follow the counter toward the back.
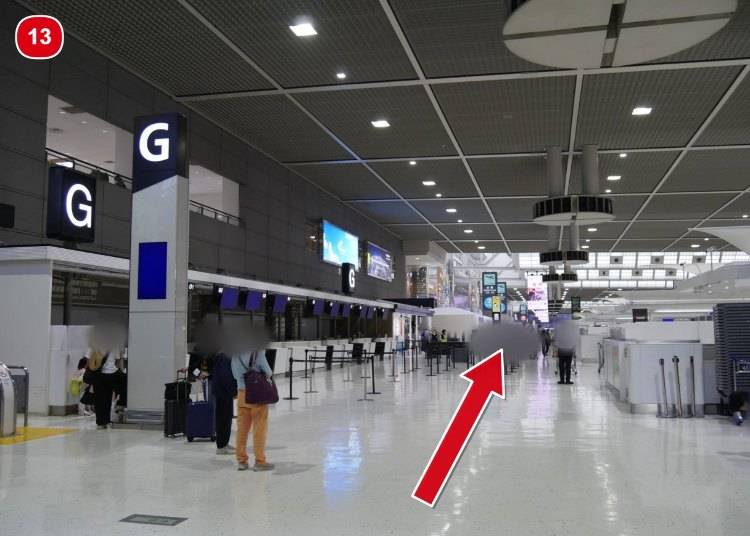
13: The pillar marked “G” and the counters
14 Past check-in counters G9 and G10, you will see a “Self Tax Refund” sign.
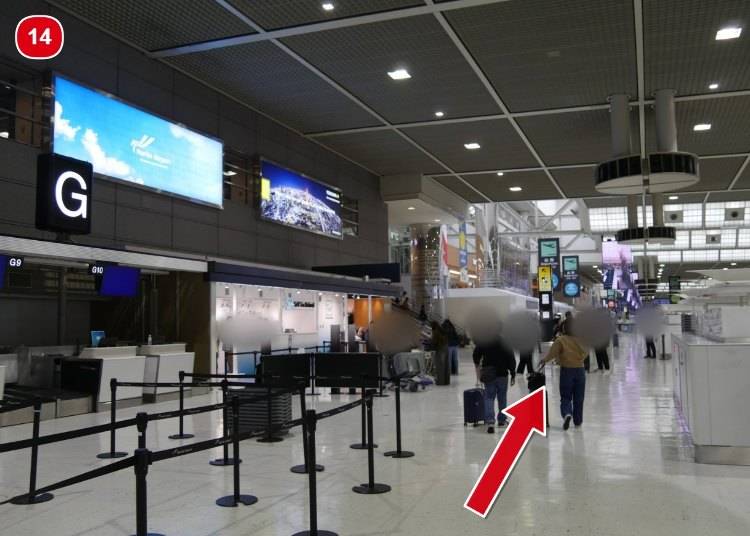
14: The “Self Tax Refund” sign beyond the G counters
15 The counter with the “Self Tax Refund” sign is the refund facility. Show your passport and receive your cash (Japanese yen). It is open 6:00–24:00 (as of November 2, 2026).
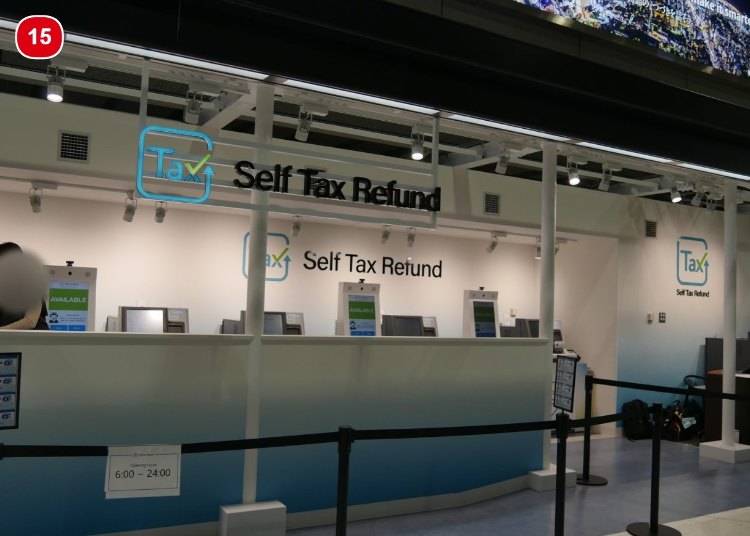
15: The refund facility (Self Tax Refund)
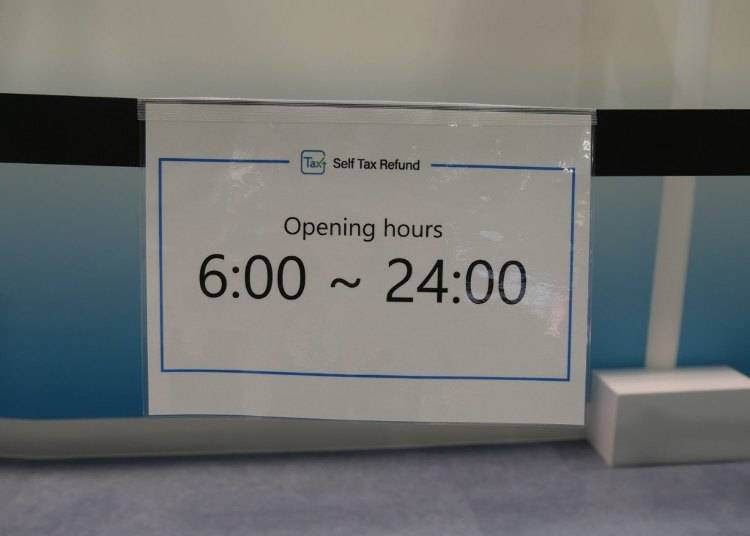
The refund facility hours sign (6:00–24:00)
Refund Operators at the Refund Facilities
Refund facilities are located both before and after departure procedures. The refund operators you can use differ by facility. It is a good idea to check with the shop where you bought which operator it uses. It also goes more smoothly if you finish beforehand any registration required for the cash refund, as directed by the tax-free shop.
- J&J Tax Free (J-TaxRefund)
- Smart Technologies & Resources (JPrefund)
- Global Tax Free-Planet
- AddSmart
- LINKTIVITY
- IntaSect Communications (InTaxFree)
- Global Blue
- J-TaxRefund
- Smart Detax
- IntaSect
*More refund operators are expected to be added. This information is as of November 2, 2026. For the latest information, check the signs on site.
For the difference between the facilities before and after departure procedures, and for Terminals 1 and 3, see Narita Airport Tax Refund: Before You Check Your Bags.
Notes Before You Follow the Route
- Before you go to a refund facility, always complete confirmation (declaration) at a customs kiosk or on Visit Japan Web. If the confirmation is not complete, you cannot receive your refund.
- The photos were taken on November 2, 2026. Signs and guidance may change.
- The route in this article starts from near check-in counter H. If you are heading there from somewhere else, aim for the area near check-in counter A.
- You get customs confirmation before you check your baggage. You cannot get it after you have checked your baggage.
- The refund facility is for receiving your refund in cash (Japanese yen). If you receive your refund by credit card or another cashless method, you do not need to operate any machine at the refund facility.
Terminal 2 Tax Refund Procedures: FAQ
- Q. Where is the customs kiosk?
- A. It is on the 3rd floor of Terminal 2, near check-in counter A. The 3rd floor is the departures floor where the check-in counters are, and it is in the area before departure procedures. You get customs confirmation before you check your baggage.
- Q. What happens if I go to the refund facility without confirming at the customs kiosk or on Visit Japan Web?
- A. If customs confirmation is not complete, you cannot receive your refund at the refund facility. Complete your confirmation (declaration) at the customs kiosk or on Visit Japan Web, then go to the refund facility.
- Q. If I receive my refund by credit card or another cashless method, do I follow this route too?
- A. No. If you want a refund by credit card or another cashless method, customs confirmation (at the customs kiosk or on Visit Japan Web) is all you need. You do not need to go to the refund facility.
- Q. Where is the refund facility (where you receive cash)?
- A. It is on the 3rd floor of Terminal 2, next to check-in counter G. It is in a different place from the customs kiosk. The sign at the customs kiosk also reads “Cash Refund Kiosk next to the Check-in Counter G.”
- Q. Which is better for customs confirmation, Visit Japan Web or the customs kiosk?
- A. We recommend Visit Japan Web. You can complete customs confirmation on your smartphone without going to the customs kiosk, and it is also handy when you enter Japan. When you leave, connect to the dedicated Wi-Fi (network name: Customs_WiFi_For_TaxRefund, password: jcustoms) in the area before departure procedures on the 3rd floor and complete the procedure. You need to create an account and register your passport information and other details in advance.
- Q. What are the operating hours of the customs kiosk and the refund facilities?
- A. The customs kiosk is open 5:30–23:00 (as of November 2, 2026). The facilities before departure procedures (Terminals 1 and 2) are open 6:00–24:00. The facilities after departure procedures (Cash Japan) are open 24 hours.* *You can enter the area after departure procedures only during the operating hours of the security checkpoint.
- Q. Which refund operators can I use at the refund facility before departure procedures?
- A. There are 6 operators, as of November 2, 2026: J&J Tax Free (J-TaxRefund), Smart Technologies & Resources (JPrefund), Global Tax Free-Planet, AddSmart, LINKTIVITY, and IntaSect Communications (InTaxFree). More refund operators are expected to be added.
- Q. Which refund operators can I use at the refund facility after departure procedures?
- A. There are 4 operators, as of November 2, 2026: Global Blue, J-TaxRefund, Smart Detax, and IntaSect. More refund operators are expected to be added.
Related Articles
Narita Airport Terminal 1 Tax Refund: Route to Cash Refund
Narita Airport Terminal 3 Tax Refund: Route to Cash Refund
Narita Airport Tax Refund: Before You Check Your Bags
Japan’s Tax-Free System From November 2026: Eligibility, Procedures, and FAQ
Japan’s New Tax-Free System (Refund Method): Guide by Company and Airport
With the cooperation of Narita International Airport Corporation
*Information as of November 4, 2026. Photos were taken on November 2, 2026. For the latest information, please check the official websites of Narita International Airport Corporation and the Japan Tourism Agency.
*Prices and options mentioned are subject to change.
*Unless stated otherwise, all prices include tax.
Popular Tours & Activities


-
Ad
Do’s and Don’ts: The Complete Guide to Sento Baths! Getting the Full Experience In Ueno’s Famous Kotobuki-yu
-

Seibu Group Launches New Chichibu Adventure Tourism Experience for International Travelers in 2026
by: Guest Contributor
-
[Starting Spring 2027] Japan's Railways Evolve Further! Why Tickets Are Changing to "QR Tickets" and a Riding Guide for Foreign Visitors
by: Guest Contributor
-
28 Best Things to Do in Odaiba (2026 Updated): Tokyo's Entertainment Island
-
5 Japanese Craft Shops in Shinjuku: From Walls of Kokeshi Dolls to Artisan Teapots
-
Don Quijote (Donki) Tax Refund from Nov 1, 2026: No Refund Service Fee
Inspiration for Accommodations
-
Family-Friendly Hotels with Free Shuttle to Disneyland: Convenient Access for a Magical Stay
-
Top Ranked Hakone Hotels with Mt. Fuji View: Enjoy Stunning Scenery from Your Private Space
-
Convenient Tokyo Hotels with Airport Shuttle: Ideal for Families and Heavy Luggage
-
9 Family-Friendly Hotels with Comfortable Family Rooms in Asakusa
-
10 Open-air bath Onsen Ryokans in Hakone for Ultimate Relaxation
-
Exploring Tokyo Station: 11 Must-Visit Spots Around the Heart of Tokyo
-
Ad

Explore Shinjuku: The Coolest Neighborhood Where Old Tokyo Meets Modern Tokyo!
-
Guide to Tokyo's Old Quarter: 7 Quaint Spots in Yanesen!
-
Japan Travel Guide: The Top 10 Cities You Have to Visit! Where Should You Go in Japan?
-

3 Gourmet Suppers in Ueno Ameyoko: Perfect Food for a Late Night or a Late Flight
-

Japanese Quality at Affordable Prices: 5 Japanese 'Veranda Camping' Items From 100 Yen Shops
by: Miyu Shimada
- #best ramen tokyo
- #what to buy in ameyoko
- #what to bring to japan
- #new years in tokyo
- #best izakaya shinjuku
- #things to do tokyo
- #japanese nail trends
- #what to do in odaiba
- #onsen tattoo friendly tokyo
- #daiso
- #best sushi ginza
- #japanese convenience store snacks
- #best yakiniku shibuya
- #japanese fashion culture
- #best japanese soft drinks