


From toilets to TVs, it seems as though practically everything in Japan has some kind of digital Japanese remote control to it. Most remotes don't come with English explanations, however!
Here we demystify and translate many of the common remote and other controls found around B&Bs, hotels, and apartments.
- Table of Contents
Note that although the following Japanese remote controls may not look exactly like the one you encounter, the basic functions and kanji characters are fairly standardized!
1. How to use a Japanese toilet's remote controls
When many visitors come to Japan, one of the first things they notice is how many buttons Japanese toilets have. While many Western toilets tend to be quite basic, Japanese ones seem to come standard with everything from heated seats to heated bum rinsing - and even some will automatically lift up the seat cover as you approach.
Naturally, each option has a corresponding setting, and here are how to operate Japanese toilet remote controls.
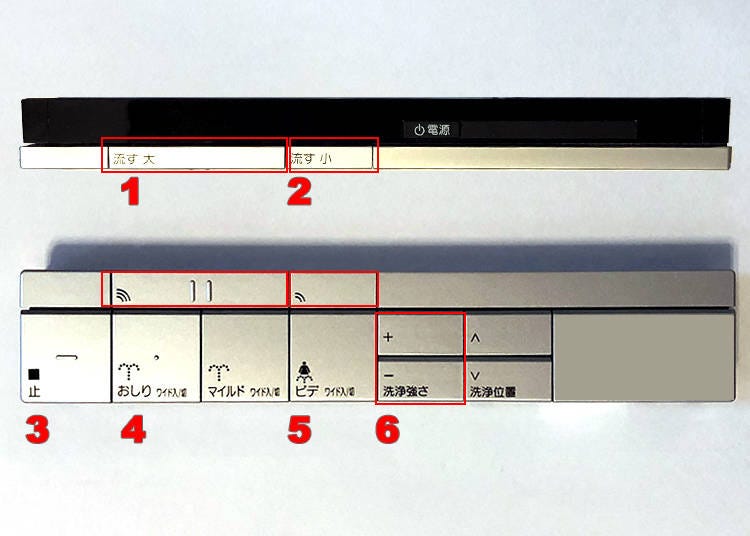
The basic functions are as follows:
- 1) 流す 大
- Flush (Large)
- 2) 流す 小
- Flush (Small)
- 3) 止
- Stop
- 4) おしり ワイド入/切
- Rear cleansing (Wide On/Off)
- 5) ビデ ワイド入/切
- Front cleansing (Wide On/Off)
- 6) 流浄強さ
- Water Pressure
While most Japanese toilets will still have a manual flush lever, it actually can be somewhat challenging to locate at times. Located on the wall or on a control panel will often be a button marked "流す" (Flush). This is often accompanied by the kanji characters "大" (Big; #1 above) or "小" (Small; #2 above), corresponding to the amount of water used to flush.
Next comes one of the more unique functions of Japanese toilets: the rinse. Depending on your desire, rinsing can come from the rear (#4) or the front (#5). Pressing the same button again will often augment the water direction, with some toilets applying a sway to the water stream while others (as in the case above) will increase the volume of water. Water pressure can be adjusted as well using the +/- buttons at #6.
Finally, a key button on the panel: #3 - 止 (Stop). This ceases all spraying and other features which might be under way.
Note that because toilets in Japan are polite to their users, many will automatically begin a deodorizing function as soon as the user stands. This will automatically stop after a few minutes has passed.
2. Using a Japanese air conditioner/heater remote
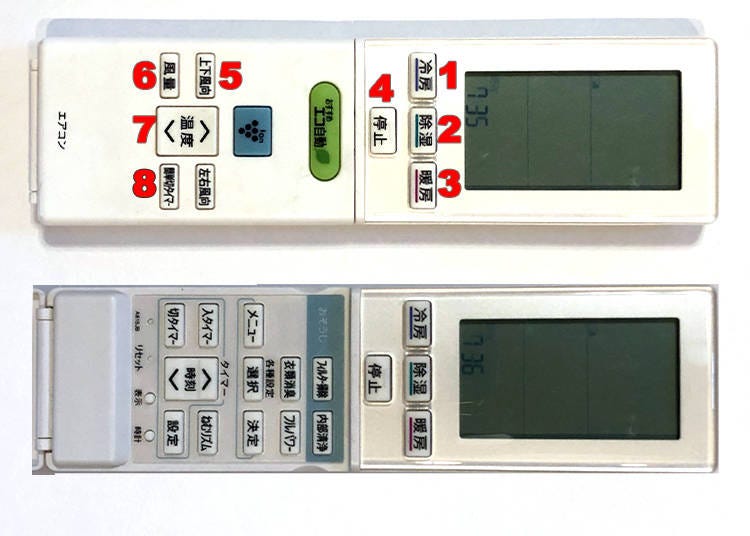
As temperatures in Japan can vary widely depending on location and season, climate control becomes quite important. Most Japanese air conditioners have three or four main functions: cool, dry, heat, and fan.
- 1) 冷房
- Cooler (A/C)
- 2) 除湿
- Dry (Dehumidify)
- 3)暖房
- Heater
- 4)停止
- Stop (Off)
- 5)上下風向
- Airflow direction
- 6)風量
- Air volume
- 7) 温度
- Temperature
- 8) 簡単切タイマー
- Off timer (Simple)
Many air conditioner remotes will have separate buttons for each core function. Many will not necessarily have an "on" button - instead, press the desired function (e.g. #1, "Cooler") to turn the unit on. Most will also have up/down arrows to increase/decrease the set temperature, which will be displayed (in Celsius) on the remote's LCD display.
One convenient feature is the off timer button (#8), which often will toggle between 1, 2, 4, and 8 hours with each press. (Many remotes will also have an "on" timer - 入タイマー - as well, which will allow you to enter the time at which you want the air conditioner to turn on.)
As with most other remotes, the "停止" (#4) button will turn the entire system off.
3. Using a Japanese tv remote control
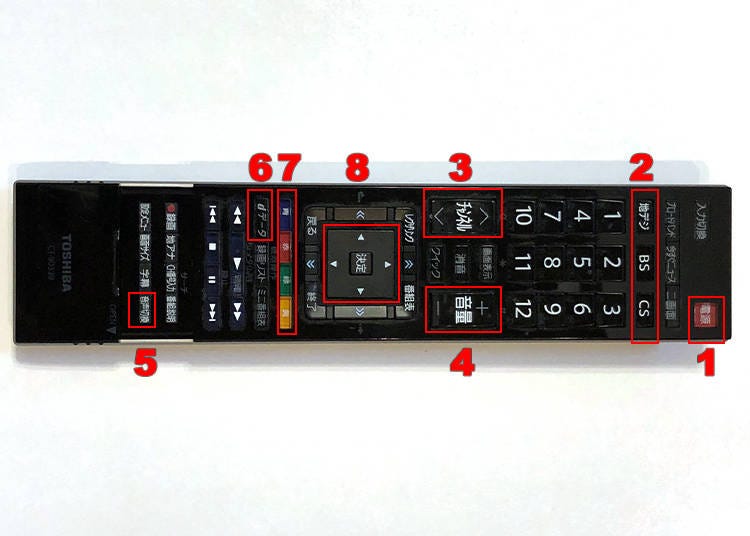
Next of importance: how to use the TV! While in many hotels, a special remote will be used, many people staying at B&Bs and ryokan will likely encounter the same sort of model used by everyday Japanese at home.
- 1) 電源
- Power
- 2) 地デジ
- Terrestrial Digital
- 3) チャネル
- Channel
- 4) 音量
- Volume
- 5) 音声切換
- Bilingual (Japanese to English audio channel)
- 6) dデータ
- D button/Data button
- 7) 青、赤、緑、黄
- Blue / Red / Green / Yellow buttons
- 8) 設定
- Set
Most of the settings on the Japanese tv remote control are quite straightforward once you know what the kanji mean, however, there are a few key differences between TVs in Japan and elsewhere.
The first is the strip shown in #2: "地デジ (Terrestrial Digital), BS (Broadcast Satellite), CS (Consumer Satellite)". Japanese TVs can tune in to several special broadcasting bands, each marked by these options. For the most part, BS/CS are subscription-only channels (like Fox, BBC, and CNN). Terrestrial Digital (local and the key national channels) programming is available in most areas in Japan for free.
As Japanese speak Japanese, most content is available only in that language; however, you may find that NHK (Channel 1 in many areas) will occasionally offer bilingual news content, which can be accessed by pressing button #5, "音声切換". Generally, if you don't hear English being spoken after pressing the button, then an English channel is not available.
Finally, a very convenient feature is the "D data" button (#6). This allows you to access additional digital content provided by the broadcaster. National public broadcaster NHK, for example, will often include basic information relating to things like local weather, traffic, and earthquakes. (If you are curious whether you just felt a shake, this is an excellent resource to turn to in order to find where a quake happened.)
Navigate using the arrow keypad around the "設定/Settings" button (#8) and select additional content using the colored buttons (#7) as prompted. To exit, press the "D data" button again or "戻る/Back".
4. Using a Japanese bath remote control
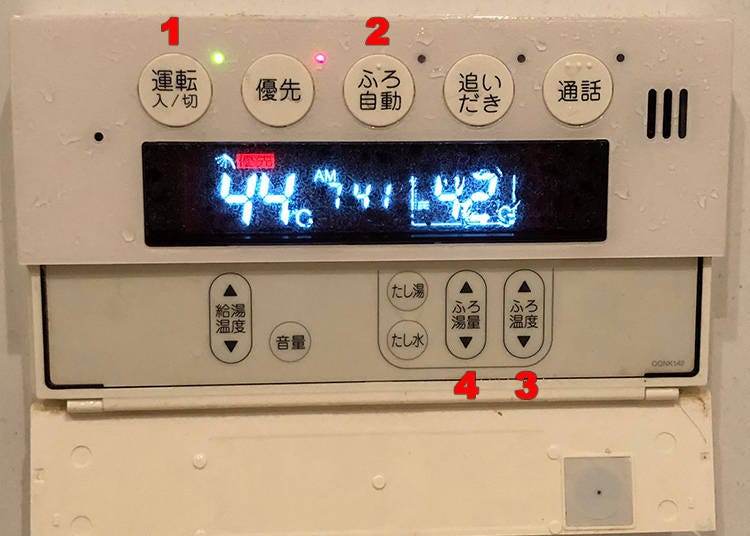
Japanese love baths - and most bathrooms in Japan are exactly that: the room for the bath. A space set aside for soaking and relaxation. While shower controls are fairly straightforward, baths will often have a separate control panel next to them.
- 1) 連転 入/切
- Run (On/Off)
- 2) ふろ自動
- Auto bath
- 3) ふろ温度
- Bath water temperature
- 4) ふろ湯量
- Bath water volume
The functions are typically quite simple. After depressing the drain stopper (usually a silver button located in a corner of the bath itself, if a drain plug isn't immediately visible) and making sure the hot water system is on (button #1), simply press button #2 (ふろ自動) and the bath will fill itself up. At some point several minutes later, you'll likely hear a chime or voice announcement indicating that your bath is ready - how friendly!
5. How to use a Japanese microwave oven
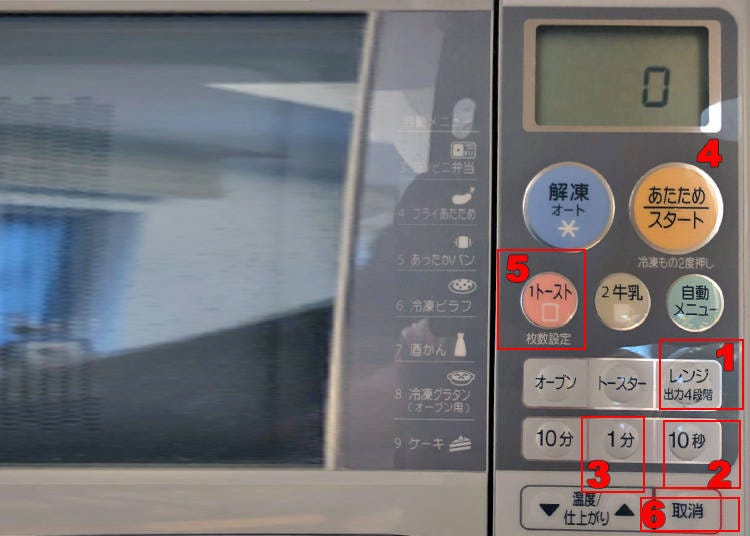
So you'd like that convenience store bento heated up - or perhaps you'd like to make some toast. Most Japanese microwave ovens combine both functions into one unit, making for a truly convenient appliance!
- 1) レンジ出力4段階
- Microwave (Power level)
- 2) 10秒
- 10 Seconds
- 3) 1分
- 1 Minute
- 4) あたため スタート
- Start
- 5) トースト
- Toast
- 6) 取消
- Cancel
Microwave ovens are fairly straightforward once you get used to the kanji symbols used. Most will power up once the door has been opened, and then await a command. The most common options here will be レンジ (microwave; button #1) and トースト (toast; button #5). Pressing button #1 repeatedly will change the power setting; pressing button #5 repeatedly will change the number of bread slices you're toasting - making for more uniform toast.
Time units are 秒 - seconds (button #2) and 分 - minutes (button #3). Press スタート (start, button #4) to kick everything off!
6. Using a Japanese washing machine
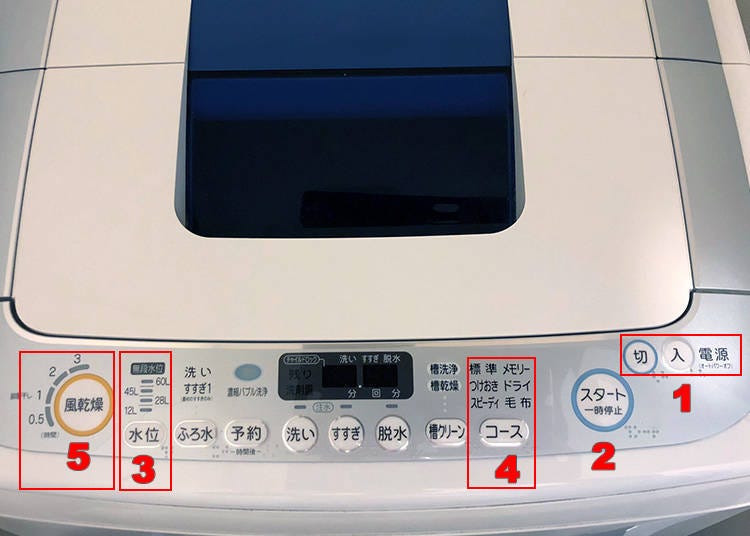
Washing machines generally come in two flavors in Japan: commercial, as seen at a coin-operated laundromat and in hotels; and residential, as seen in most rental apartments and similar accommodations. Functions will vary widely depending on the manufacturer, with some having an inbuilt drying function while others are dedicated solely to washing clothes and little else.
Quick culture note: most Japanese do not have a dedicated clothes dryer as is found in many Western homes. Instead, many folks will opt to air-dry clothes outdoors. Some newer buildings will also have a drying function embedded in the bathroom fan which will heat the space up and dry clothes in about 2-3 hours. In this case, a separate Japanese remote controls control may be located on the bathroom wall labeled with a ドライ/Dry or 乾燥/Dry button used to activate this function.
- 1) 切 入
- Off / On
- 2) スタート (一時停止)
- Start / Pause
- 3) 水位
- Water volume
- 4) コース
- Course
- 5) 風乾燥
- Dryer
A decided convenience when it comes to Japanese washing machines is that many are completely automatic: simply place clothes in the washer, turn the machine on with the 入/on button (#1 above), press スタート/Start (button #2), and the machine will automatically determine the right amount of water needed for the load. (At this point you can add the right amount of detergent needed.)
To manually increase the water volume, simply press button #3 (水位/water volume) until the desired level is reached. To measure out the right amount of detergent, simply look at the lamp next to button #3 (e.g. 45 liters) and measure out the corresponding amount indicated by the lines and numbers in the detergent's measuring cup or cap.
Next up: checking the wash course. Generally, the default setting - "標準/Standard" - is adequate for most loads. If a different setting seems to be selected, press button #4, "コース/Course" to choose this setting.
Finally, how to dry your clothes? If the washing machine is equipped with a drying function (風乾燥), simply keep your load in the machine and press this button to set a time. Note that it may take longer for clothes to dry than with a dedicated dryer.
7. Using Japanese air purifiers
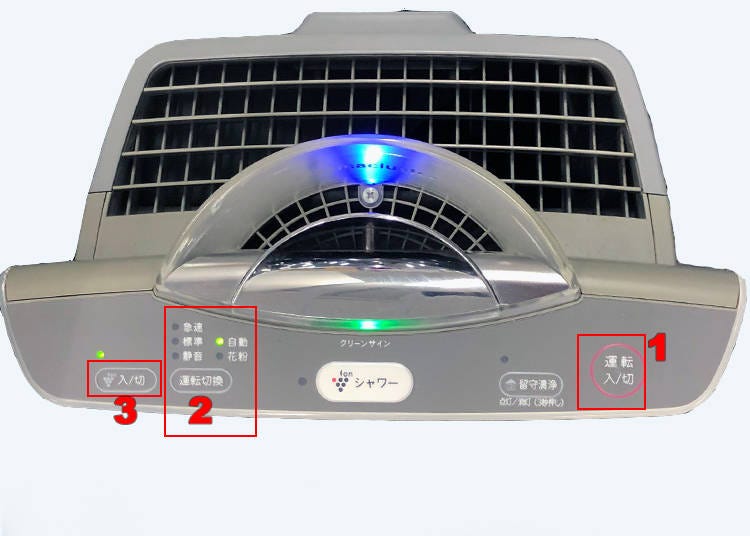
Air purifiers are now quite commonplace at many hotels and guesthouses around Japan, with some even sporting HEPA filters, ion generators, or a function to regulate air humidity. Despite the added bells and whistles, the core functions can be reduced to the following:
- 1) 運転 入/切
- Run (On/Off)
- 2) 運転切換
自動、標準、静音 - Run Mode
Auto / Normal / Quiet
- 3) 入/切
- ionizer on/off
As with most electronic appliances in Japan, you'll see "入/切 (On/Off)", however with air purifiers it may be to turn on/off the unit (as with button #1) or to activate/deactivate a particular function (as with button #3).
Given that air purifiers are intended to run for longer periods of time (and especially overnight), most will have an option (button #2 in this case) to change the air volume. "自動/Auto" is generally a good place to start, however if the purifier seems too noisy during the evening hours, selecting "静音/Quiet" will turn the fan into a whisper.
*Prices and options mentioned are subject to change.
*Unless stated otherwise, all prices include tax.
Popular Tours & Activities
Recommended places for you
-

Ameyoko Shopping Street
Old Towns (Shitamachi)
Ueno
-

Jukuseiniku-to Namamottsuarera Nikubaru Italian Nikutaria Sannomiya
Izakaya
Kobe, Sannomiya, Kitano
-
Goods
Yoshida Gennojo-Roho Kyoto Buddhist Altars
Gift Shops
Nijo Castle, Kyoto Imperial Palace
-

Osaka Aquarium KAIYUKAN
Zoos, Aquariums & Botanical Gardens
USJ, Nanko Port
-

ISHIDAYA Hanare
Yakiniku
Kobe, Sannomiya, Kitano
-
Appealing

Rukku and Uohei
Izakaya
Sapporo / Chitose
-

(2026) 18 Stories You Can Carry Home: Immersive Cultural Experiences in Tokyo, Kyoto, and Osaka
-

Skip the Stress in Japan: Meet the New "TOURIST PASMO" Travel Card
by: Guest Contributor
-

Coffee, Curry, and Titanium Gear: We Check Out Snow Peak LAND STATION TOKYO
-

Japan's "Red Arrow" Train Gets a 2028 Redesign by Gundam’s Creator
by: Guest Contributor
-

Explore Tokyo and Kanagawa to the Fullest! A Seamless Journey with the Odakyu Digital 1-Day All-Line Pass
by: Guest Contributor
-

May Events in Tokyo: Fun Festivals, Food, and Things to Do
-
Ad

13 Tokyo Activities to Book on Rakuten Travel Experiences for Unforgettable Memories
-

Top 3 Restaurants: Best Sushi in Dotonbori According to a Local Food Critic
-

Japanese Foods List: 16 Crazy Tasty Japanese Tohoku Region Dishes You've Never Heard of
by: Guest Contributor
-

Universal Studios Japan: Guide to Osaka's Giant Theme Park Attractions!
by: WESTPLAN
-

MUJI Hotel Ginza: Inside the Unique Inn With an Authentic MUJI Experience!
-

5 Best Hotels Near Universal Studios Japan (Osaka): Top-Rated Places to Stay
by: WESTPLAN
- #best sushi japan
- #what to do in odaiba
- #what to bring to japan
- #new years in tokyo
- #best ramen japan
- #what to buy in ameyoko
- #japanese nail trends
- #things to do japan
- #onsen tattoo friendly tokyo
- #daiso
- #best coffee japan
- #best japanese soft drinks
- #best yakiniku japan
- #japanese fashion culture
- #japanese convenience store snacks